Install
Follow these steps to download, install, and activate Divi BodyCommerce. One plugin ZIP includes Divi 5 and Divi 4 modules.
Prerequisites
- Latest WordPress
- Latest Divi (Divi 5 or Divi 4)
- Latest WooCommerce
- The Divi BodyCommerce ZIP from your Divi Engine account
Possible conflicts
warning
Divi BodyCommerce includes the Divi Ajax Filter codebase. If Divi Ajax Filter is already installed as a separate plugin, deactivate it before running BodyCommerce. Running both can cause conflicts.
Download Divi BodyCommerce
- Sign in to your Divi Engine account.
- Open Downloads.
- Download the Divi BodyCommerce ZIP.
Install and activate
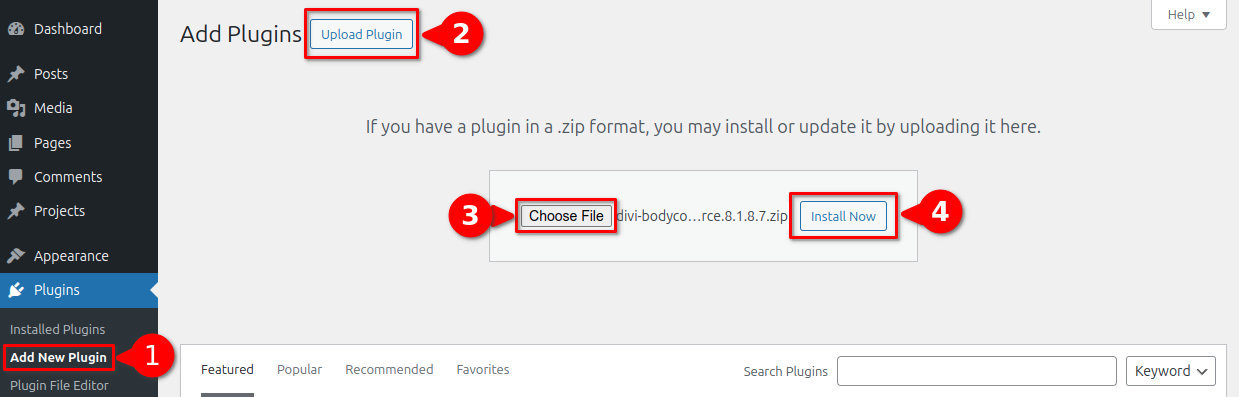
- In WordPress, go to Plugins → Add New Plugin.
- Click Upload Plugin.
- Choose the BodyCommerce ZIP, then click Install Now.
- Click Activate Plugin.
Confirm activation
- Confirm Divi Engine appears in the WordPress admin menu.
- Open a test layout in the Divi Visual Builder.
- Confirm BodyCommerce modules appear in the module picker:
- Divi 5 BodyCommerce: purple BC modules such as Add to Cart and BC Gallery
- Bundled Ajax Filter: Archive Loop and Filter Posts (shown with AF names when standalone Ajax Filter is also detected)
- Divi 4: prefixed names such as PL Add to Cart or ARP Product Loop
Activate the license
- Sign in to your Divi Engine account.
- Open Orders, choose Manage License, and copy your BodyCommerce key.
- On your site, go to Divi Engine → Licenses (or follow the admin notice), paste the key, and Activate.
Troubleshooting
- Upload failed: Keep the file as a
.zipand confirm your host allows uploads underwp-content/plugins/. - License will not activate: Remove extra spaces from the key and confirm the subscription is active.
- Modules missing in the builder: Confirm WooCommerce is active and you are using the matching Divi version (5 vs 4).
- Fatal errors after activation: Deactivate standalone Ajax Filter, then retry.
Keep the plugin updated
Prefer automatic updates under Plugins → Installed Plugins when available. Test major updates on staging first.
What's next
- Quickstart
- Divi 5 Migration Tool if you are moving existing layouts to Divi 5