Enable Payments in a Form
The Divi Form Builder module allows you to accept payments through your forms using Stripe and PayPal. This works on all form types, including contact forms, post creation, and user registration. Payments can be fixed, user-defined, or dynamically calculated using conditional logic or quantity fields.
Step 1: Add the Form Module (or use an existing form)
Use our Form module on your page/layout or edit an existing form.
Step 2: Enable Payments
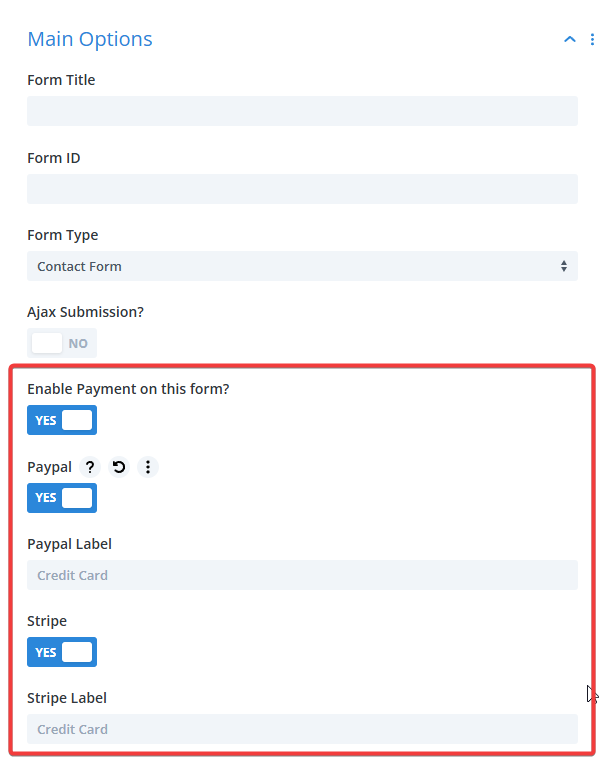
In the module settings:
- Go to the
Contenttab. - Scroll to the Main Options section.
- Set Enable Payment on this form? to YES.
- Enable either Stripe, PayPal, or both depending on your preferred gateway(s).
- Customize the Stripe Label and PayPal Label – this is the button text users will click to select their payment method.
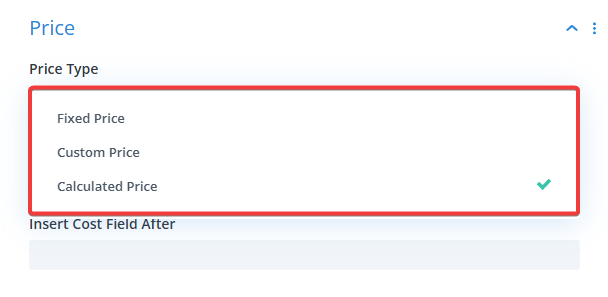
Step 3: Set the Price Type
Navigate to the Price section to define how the price is determined:
Price Types:
- Fixed Price – One static price.
- Custom Price – User can input the amount they wish to pay (useful for donations).
- Calculated Price – Dynamically generated price using calculated fields in the form.
If Using Fixed Price:
- Enter the specific amount under Fixed Price.
If Using Custom Price:
- Set Minimum Price, Maximum Price, and optionally:
- Default Price
- Step (increment size)
- Validation Messages for each range.
If Using Calculated Price:
- Ensure your form contains a Calculation Field.
- Ensure that the Calculation Field contains a formula to determine the price (check out Calculable Fields for detailed information on formulas).
Only 1 Calculation Field is supported on a Payment Form. Please do not add more than 1.
For All Types:
- Set a Price Label (e.g. "Total" or "Your Price").
- Use Insert Cost Field After to control where the price is shown in the form layout.

Step 4: Configure the Payment Section
In the Payment Form Settings panel, configure how the payment form appears:
Product Name – Use static text or dynamic tags (e.g. %%f_service%%) using Field IDs to define what’s being purchased.
Label for the Payment Section – Optional label shown above the payment UI.

Select Payment Form Type – Choose from:
- In Page (inline form)
- In Modal Overlay (popup window)
If you use In Modal Overlay, a new setting will appear:
- Payment Submit Button Text – Text for the button that triggers the overlay. You can use
%sas a placeholder for the final price in the submit button text.

Additional Options:
- Show Payment Selection Buttons – Toggle on if you want the user to choose between Stripe and PayPal.
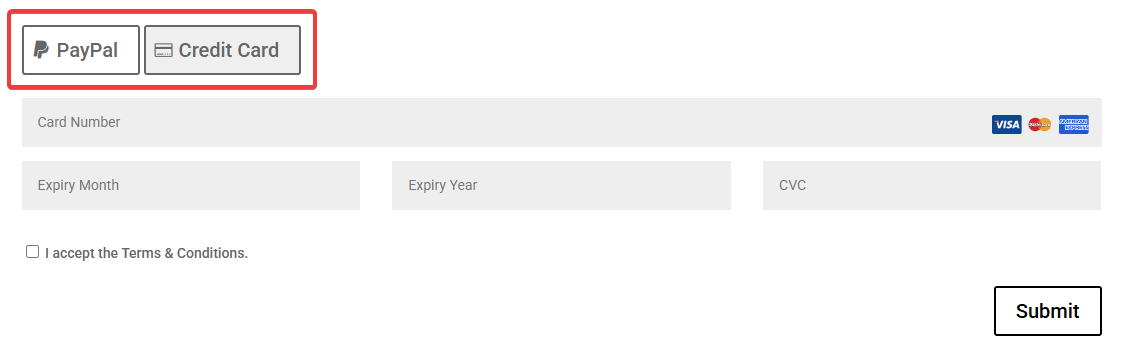
- Show Payment Form Field Labels – Toggle on to display field labels for card details.
- Customize:
- Card Number
- Expiry Month
- Expiry Year
- CVC
- Customize:
- Show Placeholders – Toggle on to show placeholder text for card details.
- Customize:
- Card Number
- Expiry Month
- Expiry Year
- CVC
- Customize:
Terms & Conditions:
- Show the checkbox for T&Cs? – Enable to require T&C agreement before payment.
- Set:
- Terms & Conditions Text
- Terms & Conditions Link
- Open in new tab? - Toggles whether to open the link in a new tab.
- Set:
Step 5: Style the Payment Area
Go to the Design tab to style the payment interface.
Styling Sections:
- Payment Area – Customize the box background, padding, borders, and shadow.
- Payment Select – Style selection buttons using Divi Button options including the icon.
- Payment Select Selected – Style selected button state using Divi Button options.
- Payment Overlay – If using modal overlay, style its background, close icon, and border.
- Payment Error Notice Text – Define styles for validation and error messages.
- Price – Customize price and label text.

Summary
To successfully enable payments:
- Enable payment and select one or both gateways.
- Set a price (fixed, custom, or calculated).
- Configure the payment display and optional T&Cs.
- Style the section to match your branding.
Payments submitted through these forms will appear in Divi Engine > Divi Form Payments.